When severe weather hits—wind, hail, heavy rain, ice, or hurricanes—your roof is the first line of defense. A quick, structured inspection after a storm can prevent small problems from becoming costly leaks and structural issues. This Roof Storm Damage Checklist is designed for U.S. homeowners and property managers. It covers safety, step‑by‑step inspection points (outside and inside), documentation tips for insurance, and when to call a licensed roofing professional.
Important: Never climb on a wet, icy, or visibly damaged roof. If you suspect structural damage, downed power lines, gas smells, or active leaks near electrical fixtures, leave the area and contact professionals immediately.
1) Safety First (Do This Before Anything Else)
- Wait for all warnings to clear. Don’t inspect during lightning, high winds, or active icing.
- Turn off power to affected areas if you see water near outlets, light fixtures, or the service mast.
- Wear PPE: sturdy shoes with good traction, gloves, eye protection, hard hat.
- Survey from the ground first using binoculars or a phone’s zoom. Use a ladder only if you are experienced and conditions are dry.
- Avoid hazards: downed lines, unstable decks, broken glass, sharp metal flashing, fallen branches.
2) Quick Triage: What to Check in the First 30 Minutes
- Document everything (photos/videos) before moving debris or making temporary fixes.
- Remove loose debris that could cause further damage (from the ground only).
- Temporary mitigation: place buckets under leaks; move furniture; lay towels or plastic sheeting.
- Cover openings you can safely reach with a tarp and batten strips; secure edges to prevent wind uplift.
- Start a storm log: date/time, type of storm (hail, wind, ice), duration, and immediate observations.
3) Exterior Checklist (Ground or Ladder View Only)
Tip: You can complete 90% of this assessment from the ground with binoculars or a camera. If in doubt, call a pro.
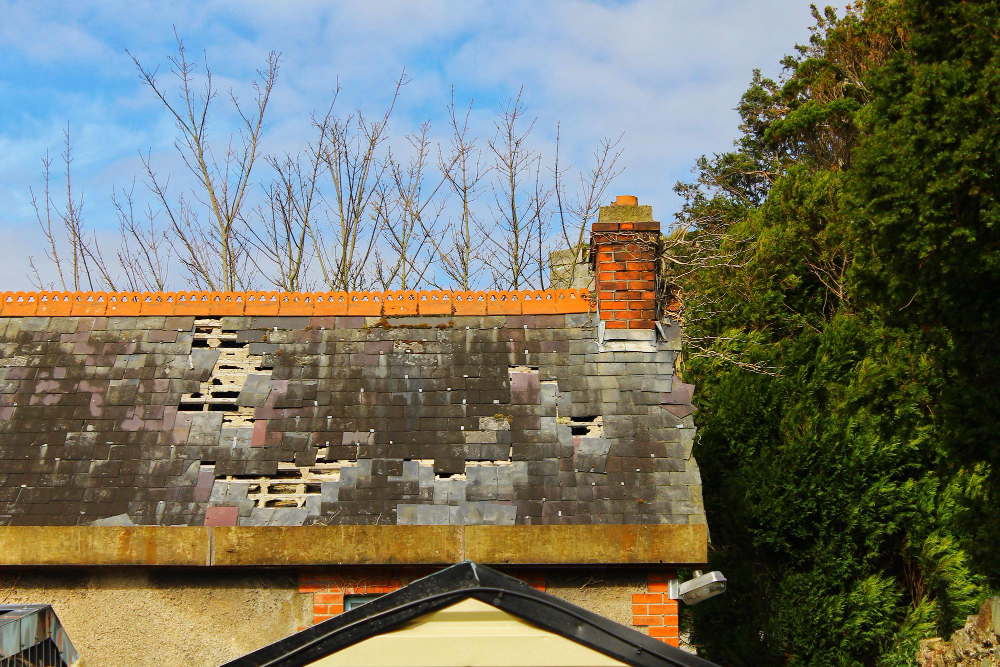
A. Shingles / Roof Covering
- Missing, torn, or creased/lifted shingles (wind damage)
- Bruises, pits, or granule loss (hail strikes)
- Curling edges or blistering (aging/heat damage made worse by storm)
- Exposed nail heads or popped fasteners
- Loose or displaced ridge caps and hip shingles
B. Flashings & Penetrations
- Flashing at chimneys, skylights, sidewalls, valleys—look for bends, gaps, or uplift
- Pipe boots: cracked rubber collars, gaps at base, missing clamps
- Satellite/solar mounts: loose brackets, missing seals
C. Gutters, Downspouts & Eaves
- Bent, detached, or overflowing gutters
- Downspouts disconnected or crushed
- Soffit and fascia: holes, cracks, or staining
- Accumulated granules at downspout outlets (signals shingle wear)
D. Accessories & Add‑Ons
- Vents (box, ridge, turbine): broken caps, missing fasteners
- Skylights: cracked glass, failed seals, water trails
- Chimneys: missing mortar, cracked crown, loose spark arrestor
- Porches/patios/flat roofs: punctures, ponding water, seam separations
E. Surroundings
- Fallen branches on roof or against eaves
- Fencing, sheds, siding damaged (helps corroborate wind/hail intensity)
- Water pooling near foundation (may indicate clogged gutters)
4) Interior & Attic Checklist
- Ceilings/walls: new water stains, bubbling paint, sagging drywall
- Around windows/doors: fresh staining or damp trim
- Attic:
- Daylight visible through roof deck
- Wet or compacted insulation
- Drip lines or dark trails on rafters and sheathing
- Musty odors (hidden leaks)
- HVAC/plumbing penetrations: water around ducts, vents, or pipes that pass through the roof
5) Storm‑Type Specific Red Flags
Wind
- Long rows of lifted or creased shingles on windward slopes
- Ridge cap displacement and torn underlayment at edges
- Loose flashing along rake/gable ends
Hail
- Dime‑ to quarter‑size impact marks on shingles (bruised granules)
- Dents on gutters, downspouts, metal flashings, AC fins, mailboxes
- Skylight frames or caps with pitting
Heavy Rain / Flooding
- Water entry at valleys, roof‑to‑wall transitions, and chimneys
- Overflowing or back‑pitched gutters
Ice / Snow
- Ice dams at eaves; water backing up under shingles
- Deformed soffit/fascia from freeze‑thaw
Hurricanes / Tornadoes
- Widespread shingle loss, missing sheathing
- Deck uplift at eaves and edges; misaligned trusses
6) What You Can Fix Temporarily (DIY‑Friendly)
- Re‑secure a small section of loose gutter with screws and sealant
- Install gutter splash blocks to divert water away from the foundation
- Apply exterior silicone to tiny gaps at flashing (short‑term only)
- Tarp a localized opening using cap nails or furring strips over the tarp edges
Avoid: walking on steep, wet, or fragile roofs; using spray foam as a permanent fix; removing large branches under tension; working near power lines.
7) When to Call a Licensed Roofing Professional
- Roof is steep, multi‑story, or surface is slick
- You see structural movement (sagging deck, cracked trusses)
- Multiple slopes with missing shingles or widespread hail impacts
- Persistent leaks near chimneys, skylights, or valleys
- You plan to file an insurance claim and need a written inspection report and photos
Ask for: license/insurance, local references, detailed scope with photos, material specs (underlayment, flashing, shingles), and warranties.
8) Insurance & Documentation Checklist
- Create a folder (digital or physical) with: storm log, photos/videos (date‑stamped), invoices, and any emergency repair receipts
- Contact your insurer promptly; ask about claim timelines and preferred contractors
- Do not discard damaged materials until the adjuster documents them
- Obtain a contractor estimate that includes material, labor, code upgrades (if applicable), and disposal
- Meet the adjuster with your contractor, if possible, to align scope
- Track communications: dates, names, call summaries
Upgrade note: If local codes require improved ventilation, ice‑and‑water shield, or higher wind/impact ratings, ask if ordinance or law coverage applies.
9) Post‑Storm Repair Priorities (Order of Operations)
- Make it watertight: tarp, temporary flashing, clear gutters
- Dry the interior: fans/dehumidifiers; remove wet insulation/drywall as needed
- Structural repairs: sheathing, trusses/rafters, decking
- Roof covering: underlayment, drip edge, shingles/metal/tile
- Flashings & penetrations: chimneys, valleys, skylights, vents
- Gutters & drainage: downspout extensions, grading away from foundation
10) Preventive Upgrades for Next Time
- Impact‑rated shingles (Class 3/4) in hail‑prone regions
- Starter strips, drip edge, and ice‑and‑water shield at eaves/valleys
- Hurricane clips/straps and ring‑shank nails in wind zones
- Balanced attic ventilation (soffit + ridge) to reduce ice dams and heat aging
- Seamless gutters with larger downspouts; leaf guards where appropriate
- Tree maintenance: trim branches 6–10 feet from the roof; remove dead limbs
- Lightning surge protection for critical appliances and sump pumps
11) Handy Owner’s Checklist (Print or Save)
Exterior
☐ Missing/creased shingles
☐ Granules in gutters/downspouts
☐ Loose/damaged flashing (chimney, skylight, valley)
☐ Bent/detached gutters and downspouts
☐ Damaged vents, ridge caps, or skylights
☐ Fallen branches or impact points
Interior/Attic
☐ New ceiling stains or damp drywall
☐ Wet/compacted insulation
☐ Daylight through roof deck
☐ Drips or dark trails on framing
Documentation
☐ Photos/videos taken (outside + inside)
☐ Storm log updated (date/time/type)
☐ Temporary mitigation applied
☐ Insurance contacted & claim number noted
☐ Contractor estimate requested
Conclusion
A structured post‑storm process—safety, inspection, documentation, mitigation, and professional repair—protects your home and your budget. Use this checklist after every major event, and invest in preventive upgrades so your roof weathers the next storm with confidence.
FAQs
How fast should I inspect after a storm?
Within 24–48 hours, once conditions are safe. Quick action reduces secondary damage.
Do small hail marks matter?
Yes. Even minor bruising can reduce shingle life and void warranties. Get a professional assessment.
Is tarping covered by insurance?
Emergency measures to protect the property are often reimbursable—save receipts.
Can I walk on the roof to check damage?
Avoid it. Most issues are visible from the ground or attic; leave roof walking to pros.
How do I choose a contractor after a storm?
Verify local licensing and insurance, avoid high‑pressure sales, and compare detailed written scopes from at least two reputable companies.